Presentation online, and if it's not working, here are the individual slides:


The Original Brief:
Stop-Motion pre-production 
Fabrication process and techniques
An in-depth look at the fabrication process for the pre-production of stop motion animation, and the influence the character of a puppet plays on its fabrication and construction.

Why? 
(Purpose & intent)
This field is the direction I want to be heading in, and I feel has unexplored areas (or at least not-well-documented ones). The traditional processes are still as strong as ever, and I feel hold a uniqueness that holds them in relevance in the current era. 
The challenge of creating puppets and armatures of characters that are capable of varying degrees of expression, as well as different shapes and sizes, dependent on their 2D designs, will be a good challenge and a great learning opportunity.

Target audience? 
(Evidence, or primary and secondary research)
The stop-motion and model/puppet making community. Stop motion amateurs and professionals, to explore the construction methods currently used and to show my own techniques for fabrication to them, for feedback from people within the field.

Which medium?
Physical puppets, photographs and short test animations. A variety of traditional and modern techniques will be researched and used.

Which platform?
The final outcomes will be physical puppets, with correctly lit photography and test pieces of animation to show their characteristics of movement/expression/character off.

Project strategies?
(Reflection, action plan, strategies i.e. in-depth study on the subject matter, micro test animation etc)
Fabrication and construction process are the main point of this project, so not too much time must be taken up with the actual design of the characters, as long as they are chosen to illustrate certain aspects of the fabrication process, i.e. flexibility, exaggeration of expression, etc. The principals of animation must be taken into account throughout, as they need to be incorporated into the building process.

Potential learning? 
(My own personal learning outcomes) 
To enhance my skill-set in the pre-production of stop-motion films, and to learn in-depth techniques for puppet and armature construction, and working with predefined character designs and the constraints they entail.

..........................

Evaluation
Working on the early brief, as shown above, I think this entire project has been a success. It has been filled with useful failures, from the alginate experiments that collapsed, to the limbs that didn't last quite long enough on the armatures. To fail is the best way to learn, and i've got a list as long as my arm of things not-to-do in the future. I feel like the only way to learn these issues is to try and them and see what happens. A small sample of the list:
- if in doubt, use larger cable connectors, if you are forced to use them at all
- even if not in doubt, don't go for the small ones
- solid wire joints if at all possible
- make sure any plaster casting is free of anything with sulphur in

Contextualisation
Going back to the purpose of the pieces I've created, working with predefined characteristics when fabricating a model or puppet is a constantly shifting process. Pre-planning and measuring is essential.

Looking at the "Ratman" character I created from a Don Kenn illustration, I think I managed to get an almost exact build of the model, with only a few minor differences in, but nothing that affected his character. The main one is the eyes having pupils, but my version can be animated with or without them, I did so with them so that I was able to do a few more animation tests. The major flaws in it are due to some fabrication choices on the joints leading to no-so-great durability, but that's a lesson or two learned.
See the images below for the original illustration on the left and my completed model on the right:


Keeping the principals of animation in mind was one of the major aspects of each build, and working out how to incorporate anticipation, exaggeration, etc within a solid model construction, and without losing any aspects of the puppet's original character design.

For example, without enough flexibility and control a puppet would not be able to move incrementally enough to  be able to use timing efficiently. This was the case with 'Ratman's' legs, as they were very short it was hard to make sure there was enough wire and bone structure in them to keep their shape but without limiting them. As a result they ended up being far too stiff to animate, which resulted in higher pressure to manipulate them, and eventually the led to one of them snapping off. He lasted for as long as he needed with these tests and photos, but from a more substantial project a new method will have to be worked out.

One of the greater successes of this project was 'Zeke's' Head. This was a latex build up of a fairly complex face armature that allowed for movement of (both upper and lower) maw in all directions, as well as eye rotation, eyebrow deforming and movement, ear deforming and movement and neck movement. Because of this I managed to get a massive range of expressions out of him. This is a fabrication method I'll be using in the future, as there seems to be so much mileage in it, especially for more caricatured and expressive characters:


From the uncertain start of this project, its fleshed out into in a great education for me on the implementation of character within the stop-motion puppet character base. Figuring out how to reach certain goals in terms of emoting and characteristics such as fear, determination, etc was a real challenge to the fabrication process. But, with the correct planning and implementation was more than achievable, and I think my final animations and photos reflect the characters and emotions that I'd set out to achieve well. Any areas of failure were ideal situations to learn from it, and try a new technique.

Also looking at other working examples from the people at Laika, Aardman etc were fairly good resources for my own work, as well as independents like Suzie Templeton and Ray Harryhausen. Seeing the wide range of techniques used, each for different styles and types of puppets and sets, made me realise that there is no 'right' or 'wrong' way to fabricate a piece, but just whatever works for you and the visual aesthetic you're going for.

It's been a real inspiration on what puppets to try next and to see where I can go from here.


Here's the compilation of test shots and animations I'll be handing in as part of my assessment work this week. Evaluation coming soon, and feedback appreciated!


Just had a bit of a photo-shoot for some printable images of Ratman, turned out to be a bit of a nightmare as he was on his last legs, joints popping out limbs falling off. Managed to get a few pics with some tinkering though. Anyway, enjoy the pictures and, as usual, any feedback is always welcome.


Finally got to do a little something with Zeke's face, getting him to emote a little and try a few different expressions and facial movements I had intended from his very construction, things like the neck and jaw displacement, eyebrow deforming as well as movement. Also a few techniques I learnt from previous feedback, such as boiling the fur (while he was angry/growling), which I think turned out great and really added to the emoting.

I still feel it all goes by a little too fast, but definitely getting there in turns of the timing, plus working on 24 frames per second, the minimal amounts are so hard to judge, onion skinning on dragon helps a fair bit with that though. I think the best way to improve this is up the scale on things. At the moment Zeke stands at about nine to ten inches tall, but I think with a slightly larger puppet, smaller movement would be much more manageable.


Not just because it's a combination of two of my favourite things, but isn't this wonderful? Gorgeous little puppets holding onto their handmade characteristics. Expressive and beautiful. This really should have been made into a full film.

Working the movement from the base of the tail as suggested by Ben, it's much improved over the last attempt. Dope sheeting required in future methink if other bits will be moving too, it'll be hard to keep track of what's going where.


The animation is a bit choppy but it was interesting to work with something that was to be a loop-able cycle and having to meet up with a pre-defined starting point. I think the feet look good, its just the upper body moving around that makes it a little choppy. Maybe a little more movement in the arms/head would improve it, but for now I achieved what I set out to do, which is to complete a walk cycle and  concentrate on the legs.

Also i got this rather nice little photo out of it:


Just another little test, with a bit of sound, seeing how it goes for now and trying to get some more testing done.


I love these behind the scenes peeks at the usually very secretive work of stop-motion studios. It's great to see some of the scales of the sets they work on, as well as the sheer numbers they have to work with when it comes to puppets and props etc. Co-ordination of the pre-production and production must be on such a massive scale, with the amount of planning of how many films they can be shooting at once.

I think the one thing that draws me into this work more than anything else is the sheer creativity and detail of the work they produce, from every shop-sign to the tiny goblets. Anyway, enjoy this little video.
  

And here's some of the feedback grouped together so I know where it is:


And a still from setting up, just because:


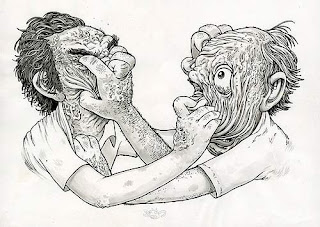
Another artist I wanted to look at for good character references is an illustrator called Travis Millard. His mostly monochrome medium is more often filled with moving, meaningful monstrosities. From pages of eye practice to expressive yet simply designed monsters. These kinds of simple yet expressive forms are useful to look at, as well as a joy to behold.


Now the following two would be lovely to do in stop motion: Double-face dude and grabby faces already look like you want to reach out and interact with them and are solid and 3D, even with simple use of line. Begging to be made into models. The possibilities of animating these are amazingly complex yet simply full of opportunities of expression and story-telling.


A Suzie Templeton interview from Don't Panic Magazine:
Your adaptation of Peter and the Wolf won the Oscar for Best Animated Short Film last year. I think it's charm comes from the exquisite model making and decision to make it a stop motion animation. What drew you to using this medium and where did the idea for the film come from?

The models are indeed exquisite. They were made by the wonderful artists and model-makers at Se-ma-for Studios in Lodz, Poland. I wanted to make the film in stop-motion right from the start. It is the medium I love the most and have the most experience in. The idea to make a new film version of Peter and the Wolf came from Hugh Welchman, (then a recent production graduate from the National Film School in the UK), and Mark Stephenson, a conductor. Had they not suggested it I don't think I would have chosen something so well-known and well-loved, and more importantly, a piece that exists so brilliantly in its own form without need of visual representation. I did always have reservations about portraying the work in a visual medium because I always thought that it was exactly the absence of visual representation which made the piece so powerful.
Tell us a little bit about the set? How big was it, and how much of it was created using the computer?

The set was gigantic. It was designed by Jane Morton, the English production designer, who used Maya as one of her tools. It was made in Poland by the Polish production designer Marek Skrobecki. It was all made by hand.
Your two films Stanley and Dog are very different from Peter and the Wolf. They seem to be based more on personal issues and in particluar issues in the home, and human relationships. You touch on different emotions, such as lust, anger and sadness. What messages are you trying to convey through your films, or should I say hidden messages?

I always work with layers of meaning in my films that are there to be explored by the viewer. If I was able to communicate them in writing I wouldn't go to the trouble of making the films!
What materials did you use to makes your models?
The puppets are made with traditional ball and socket and wire armatures in foam latex bodies. The animal fur is ordinary fake fur expertly laid in small pieces onto the bodies. The human hair is various types of animal hair such as llama wool. The human skin is made of silicone. The clothes are made of real cloth.
It amazes me how you are able to capture such emotion through the eyes of your models, especially in your film Dog. Is there a special technique you use to do this?

The eyes are very important to me to convey emotion. The eyes in both Dog and Peter and the Wolf are ordinary painted plastic beads. I use glycerine to make the eye surface wet and sometimes animate the glycerine itself. But mainly the illusion of life is achieved by subtle movements and acting.
The animals in your films are very realistic. Did you study real life animals to capture their movements?

Yes, I filmed crows, runner ducks and fat cats as reference for the animators. I also spent a couple of days at a wolf sanctuary to study wolf behaviour and movement. I would have loved to send the animators to the same place, but unfortunately the budget would not stretch to that. I would have loved them to have the same experience as I had, really feeling the spirit of the wolves first hand. I assumed before I met the wolves that they would be very similar to dogs, but they are very different indeed, in spirit and movement, and I would have loved for this to come across in my film.
Are your characters based on people you know, or are they purely imaginary?
I am inspired of course by events and people in my life and my own experience. Some characters might be based physically on real people, but that is as far as it goes.


What are you working on now?

I am writing a feature, working on a fun, small short and i'm open to commercial work.

After ordering a few more pairs of the 'helping hands' I dismantled the lot and had a look at what sort of components would come in useful. Turns out, nearly all of it was, and I was able to build myself some nice pieces of rigging without too much tinkering. What's extra-nice about it all is that it's fully customisable depending on the character and shape of the puppet being used. Check out a few action shots of it being used here:


Also, cleverly disguised with a bit of black cloth here:


  • Sanding the ball joints to a rough finish helps keep them tight and grippy
  • Doubling up the side portions of the ball joints makes them much less likely to deform under pressure and therefore much tighter
  • Replacing the desk clamp with an old chemistry retort stand, much more stable, slightly harder to manoeuvre  but will hold much more weight.
Problems now seem to be solved...

   
Getting the stage I'd built earlier on ready, I decided it'd be best to glue some non-slip mats to the bottom of it just to reduce the chances of it moving while filming, even though it'll be clamped down. I'd rather over-prepare than under prepare. Also, it turns out the rig clamp fits just nicely onto it and seems to work quite well, although I'm worried the cheap metal ball joints are going to give way after a while, but we will see. It seems to be doing the job for now.

And here are two of the puppets here for a size comparison. I'm pretty excited about animating 'Ratman' as he feels nice and solid (touch wood), and I've always wanted to have a go at doing a tail swooshing around. Not only that, but a good experiment in fur also.


Finish up the model, final coats of latex, making sure the fur is the right length. Next up is taking Ben Whitehouse's advice and adding some dirt and skin blotching to keep the flesh looking real. I'm still not 100% sure about what the ears are doing being a mix between flesh and black. The black seems too contrast-y and the flesh doesn't stand out enough but I really want to keep a limited colour palette to the whole piece.

There should be a few new photos going up soon but for now I need to concentrate on getting the mes tidied up and the stage set for a bit of animating as time is pressing on and the timetables says it's photography and animating time. Fingers crossed the construction of the puppet will hold up to the job!

When it came to rigging I was looking around and the best I could find was a £49.99 piece. I thought I could do something similar myself and had a good idea how to go about it. First step was to buy a pair of "helping hands" online, then get about breaking it down into it's component parts. 


After a bit of moving parts round, I had it how I wanted it, it was simply a case of a bit of resin and M4 screw rod. I was originally going to find a heavy base for it, but I had an old clamp off a ping-pong net lying about and it fitted just nicely, and should make it even more secure. The Ball joints aren't the best but I think it'll do the job it's intended for. So I've saved myself £45ish.

I may give it a coat of green/blue paint so it's easy to key out if need be.


The past few days have been taken up with various bits of work, but one of the main ones is the completion of the hands and feet for the "Ratman" model. Here's how it went:
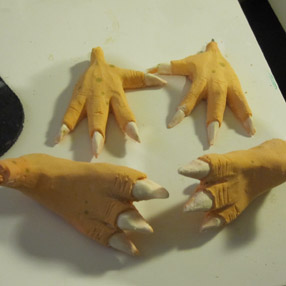
 First step was to model the feet, to scale, out of super sculpey, and make sure they were going to look OK size wise on the model. I wanted to keep the oversized style of the original illustration, as this would look really nice when animating.

 The next step was getting them cast, so dishes were made and lined for easy removal once it had set. The plaster was then mixed up, as best I could to avoid bubbles and lumps. Added to mould and left to cure.

The moulds were removed carefully after a few hours, and cleaned up. The detail quality looked really rather nice, and kept all the little marks of the models. Next up was getting a first layer of skin painted into the moulds, along with details such as spots and nail colour.

Then it was a case of making some hand and feet armature to fit snugly into them,making sure to be padded with foam to keep a soft shape. Also, keeping the wire right to the tips of the fingers and wrist, to make sure they were flexible right up to these edges.

Pour on the latex (a slightly redder tone for under the skin transparency to show through). Any split blobs or splats can be worried about later as the flash lines won't be too much of a problem to clean up afterwards, and will actually aid in the removal of the latex from the mould once set.

Repeating the process for the feet (slightly more complex armature required for them, as they will be involved in the anchoring and rigging of the character to the floor, and supporting his weight).

To note: I'll be using M4 size threaded rods and bolts for this puppet, for both the tie-downs and rigging.

Then it was a case of waiting and topping up the latex as it dried into the moulds, the process took a good two days or so to fully dry out.

 The removal from the mould went smoothly thanks to the rigging points on the feet and using the flash lines to lift them out. Then the flashes were trimmed off with some nail scissors (why hadn't I started using those sooner? They're perfect!).

All that's left is a bit of touching up the latex with some painting and affixing them to the rest of the puppet securely. The skin blotches and other details worked out nicely, and the more I use this technique, the more I'm sure it's the way to go with model making.